Saturday, July 9, 2016

How to Photo Tutorial - Potting up a Carnivorous Plant: Venus Flytrap

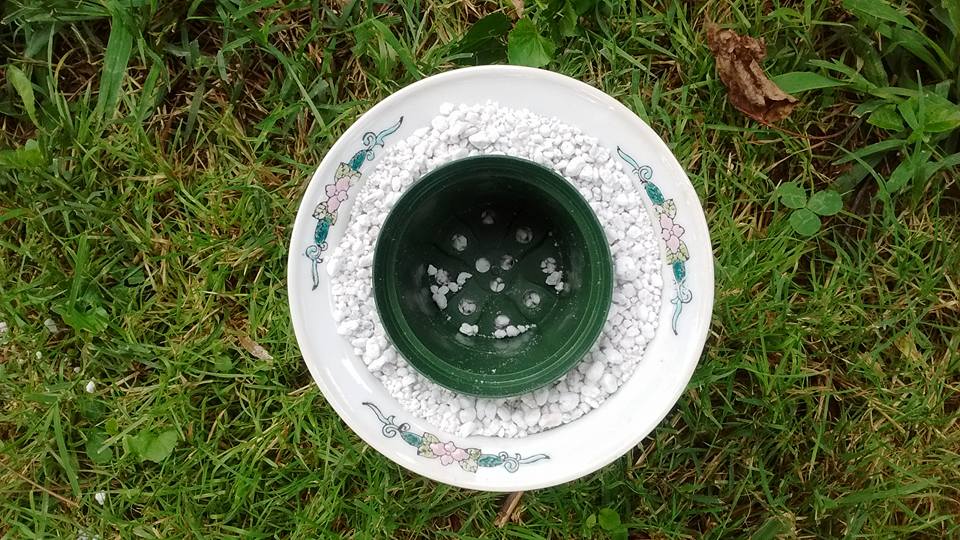
A Venus Flytrap Looking Perky and Happy in his New Insulated Pot (above)


Earlier this year, I purchased a Venus Flytrap on a whim (Aldi's of all places had them for a song) and promptly killed it. It was suggested to me that I should have placed it in a closed terrarium. I've been playing with succulents in terrariums and happened to have an unused egg-shaped one with a lid. I stopped at my local Lowe's Hardware and picked up another to try again. Having done some research, I found sites that described how to place one in such a terrarium, but I also came across discussion boards and other sites where keepers of carnivorous plants explained why this was a bad, bad idea.

A Terrible, No-Good Idea


You see, while Venus Flytraps do like a good amount of moisture and humidity, they are more like citrus, in that they want that abundant moisture, but they also want the water to flow through their root zone, rather than stagnate. They are not going to do well in standing moisture, with limited air flow as a terrarium (either open-style or with a lid) provides. While they can take a little time in standing water, thrive even for a bit, prolonged periods will bring on fungal issues and eventually kill them. Of course, they can thrive in an outdoor bog setting if your temperature zone allows (zone 8 and above). Mine is not quite there (7b) so I'm opting for an indoor set-up. 

They also need to be potted up alone, as they have a dormancy period that is a bit different than other carnivorous plants. During this time, while they should still never be allowed to dry out completely, their water supply should be reduced. There's more to know about their dormancy period, but we'll save that for another time, as right now, we're just trying to keep the plant from dying in his little Box of Doom that the big box stores usually have them potted up in.


The Captain sits inside his Box of Doom beside his Unassembled New Home

I amuse myself by giving my plants, garden areas, and whatever else strikes my fancy, rather ridiculous names so this is Captain Von Trapp (oh yeah, I'm going for the obvious cheesiness of it there, ha!). The Captain's packaging is too much like that undesired terrarium, so this situation will not abide. I'm going to set up a DIY insulated pot for the Captain using a pretty glazed pot as the exterior with a smaller plastic pot set up within it.

Creating an insulated pot will help buffer the root system from feeling big swings in temperature. Plants set in the ground get natural buffering from the earth they sit in. An insulated pot mimics this, providing more protection for sensitive plants like the Captain, than a pot without insulation. There are insulated pots for purchase at many garden and big box stores. Some DIYers make pots out of cute, ready-made insulated containers - like mugs - by drilling or puncturing the bottoms to make drainage holes. I'm going to use two pots I already had sitting around, and the perlite that I'll also use for the soil mix, to create my own insulated pot.

Also of consideration is the type of pots chosen. Plastic, glass, or high-fired glazed pots are good choices. Here, the aim is to avoid any pots that might leech minerals or impurities into the Captain's sensitive root zone. With this in mind, my pots are also nice and clean.


Assembly of the Insulated Pot


First step is to cover the bottom of the larger pot with a layer of perlite. Be sure to use perlite that has no additives. Place the smaller pot on top of that layer and check to see that the tops of both pots are even. If not, add or remove perlite as needed to level them.


Scoop more perlite between the two pots, filling in the area completely. If a few stray bits fall into the inner pot, there is no need to worry. You can pick bits out if you think an excessive amount has fallen in. There are a few bits in there, seen in my photo below. This is not an amount I'm going to bother with, so there they will stay as I begin the last steps before settling the Captain in.


Now it's time to put together the soil mix. Once again, the sensitive roots are what I am catering to. A basic mix of equal parts peat moss (decayed sphagnum moss) and perlite will supply nice drainage but allow enough moisture retention that the Captain should live much longer than his predecessor (RIP Trapper John). It is important to choose peat moss and perlite that do not have any added ingredients like fertilizers. I was able to find both of these at the Home Depot near my house, but had to buy much larger bags than this project requires. The only smaller bags available had additives that the Captain would not tolerate. Luckily, I have other uses for these and both are inexpensive. 


Making the Soil Mix


To measure equal parts (by volume, not weight) of my peat and perlite, I used a little red bowl to scoop from each. This will make more soil that I need, but the remainder will store easily for another use. 


An old Tupperware container from a thrift store makes for handy mixing and storage. I don't worry about being too exact - I'm not baking a cake here - just scoop them together


Hand mixing such a low volume is easy peasy. Just plunge your hands in and stir them about. I always wear gloves when I make soil mixes. I'm not really sure that it is necessary with this simple mix. When it looks well combined, it is ready for use.


Bustin' out the Captain


I have left the Captain stewing in his Box of Doom until everything is ready for his arrival. He is a good healthy looking specimen, with a cute little rosette of traps.


Inside the plastic box there is another plastic piece that holds the Captain's pot in place. I pull that piece and the potted plant out all at once and then remove the Captain from his pot and out into my hand. In the picture some of the sphagnum moss (it is the not-decayed type that is light colored and stringy looking) that was wrapped around his little root can be seen. This type of moss is often used like this around the roots of flytraps. The one I killed, I had left in this type of planting. I believe this to have been one of my mistakes. The decayed version of sphagnum (which is dark and dirt-like) mixed with the perlite, should allow much better drainage while still offering the Captain some moisture retention.


After gently lifting the last of the moss from around the roots, the Captain is held in his pot and the soil mix gently scooped in around and covering the roots. When the pot is filled in, lightly pat the soil into place. The moss removed from the plant can be used as decorative cover over the perlite (as shown below).


Using the red bowl again, I brought some water from the rain barrel and let it trickle into the Captain's new pot. Like other carnivorous plants, Captain Von Trapp likes pure rain water or distilled water. Tap water has minerals along with other additives that will harm sensitive plants like the Captain. To get around this you would need a reverse-osmosis water treatment system, which isn't as expensive as it used to be. Still, I have a mortgage to pay so for now, I stick to the rain barrel water or jugs of purchased distilled water for my carnivorous plants and shrimp tank.


The goal now that he is settled in, is to keep the Captain moist, but not water-logged. With the original potting materials removed and the new soil mix and insulated pot in place this should be easier to maintain. So far so good. Cross your fingers for me and the Captain.


Thursday, May 8, 2014

Scenes from the Backyard Gardens


 Darlow's Enigma (on the left) is now officially a monster. Crimson King (the pink roses to the right - that I like to call Fripp Robert because I am a geek) will be there in the not-too-distant future. Given we have no more bouts with the dread RRD (Rose Rosette Disease).

 A close-up from the largest of our grape vines - who will be producing grapes for the first time this year - woot! This is a white table grape - Niagra I think.

 Hellebores, hellebores, how I love you!

 And you too, hellebore!

 The Japanese maple - Bloodgood - finally has advanced past its "Charlie Brown Christmas Tree" phase. 

 The kiwi is starting to get some size to it. Still no sign of blooming. She may need another year to fruit (yes, we have a male too - its just out of the frame on the left).

 An encore appreciation of Darlow and Fripp, er, the King.

Papillon rose on the left; Apple Jack on the right. There is the foliage of  a climbing hydrangea in there too.

Some Scenes from the Front Yard Gardens


A basket of petunias hanging above some Iris from my Mother-In Law's Illinois garden.

The Irises again, this time seen with a Rainbow Knock Out rose and Egyptian Walking onions.

Egyptian Walking Onions with ground orchids (Bletilla striata) in the shade behind.

Another view of those handsome onions. They are decorative and delicious!

Iceberg rose with daylily foliage and unknown red roses (I think the larger red blooms are a Robin Hood).

Primrose and peonies.

Purple onion surrounded by strawberries and monarda - foliage of the crinum, White Queen, behind the onion.

Gold Medal rose.

Double Knock-Out rose.

Unknown rose (was labeled as a Pat Austin but has too many petals to truly be that) with Apple Jack reaching over from the other side of the fence.

Sweet William

Shitake Mushroom Log


We got our first little harvest from the Shitake mushroom log.


Monday, June 24, 2013

RIP to a White Oak


A large white oak (Quercus alba) by the back end of the house has been on a slow decline for a few years now. I've been told by a couple of different tree guys that the large oaks in the area that seem to be dying off in the last 5 or 6 years were all damaged badly by the severe droughts of 1998-2002 and now are succumbing to opportunistic pests and fungii taking advantage of their weakened state.


 Most of the canopy had already been removed when I took these photos. You can see how tall the tree was. I'm always amazed by the skill and steady nerves of the guys who climb trees to take them down. Watching the branch they stand on sway with each removed limb takes my breath away.


A dogwood tree underneath it took a few blows. I might go ahead and take that tree down to allow another much more vigorous dogwood beside it to have more space.I haven't decided yet. Its amazing that more damage didn't happen while getting the oak down. There was so little space to drop the branches in that I was afraid we'd end up having to redo the roof of our little outbuilding (what we generally refer to as the shack). The shack survives with just a couple of minor dings. I've got a few dents in the ground I'll have to refill with soil and an awful lot of sawdust to rake about. It would be impossible to get the sawdust up so I'm just aiming to thin the layer of it by spreading it further. Then I'll throw some compost on top of it to offer up some additional nutrients while the sawdust breaks down. Decomposing wood tends to bind up nitrogen so I need to counter that a bit. Plus the nitrogen will help speed up that decomposition process. So I'll probably scatter about a mix of alfalfa meal, blood meal and coffee grounds too.


Saturday, June 15, 2013

Here it Comes - Rose Rosette Disease

A lot has changed in my gardening since I have once again encountered the dreaded RRD - Rose Rosette Disease. My initial introduction happened a decade ago when I received a pair of mail order roses - both Pat Austins. Or so they were supposed to be. When they leafed out and then bloomed it was clear they were not the same rose. Then, the one that was an actual Pat Austin developed the strangest looking growth. The color of the new growth was very striking. The red of this growth was...redder.  And it was significantly thornier and had the look of being almost succulent - like my rose had suddenly been crossed with a jade tree.

An infected rose in my garden.

Of course lots of roses have new growth that looks different at first, but then sort of hardens and greens up with time. When looking at RRD-infected growth, this visual difference remains and does not "green up." The leaves may look twisted. Some describe this symptom as having a "rosette" shape (thus the name of the disease) but the leaves may not be as fully turned on themselves as that description may seem to imply. An infected cane may go on to form what is called a 'witches' broom', where a branch develops an unusual amount of stems emanating from its end point and looking very broom-like. However, this unusual broom-like growth can have other causes such as damage from herbicides like Roundup. Excessive thorniness is something to be especially on the lookout for. This is considered the symptom that specifically indicates RRD and not herbicide damage according to a paper authored by K. N. Conner and A. K. Hagan. This does not mean that a rose without excessive thorniness is necessarily RRD-free. It would be nice if things were as simple as that now wouldn't it? Rather, it is the accumulation of symptoms to look for:
  • odd color - reds are deeper; greens may look lime-green for example
  • witches brooms
  • increase in thorniness
  • thorn tips may feel "soft"
  • strange thick, succulent-like canes
  • leaves are distorted, looking a little twisted or smaller than usual
  • abnormal flower buds - with larger sepals and distorted color for example
When you see multiple symptoms, especially the thorniness, discoloration and odd succulent-like canes, you can be sure of what you are looking at (even though you may not want to be).

Now to make it even a little bit more complicated - different rose cultivars can exhibit the infection in slightly different ways. An early sign of infection for example may be a rose that is beset with powdery mildew when it is not usually prone to it and other nearby roses remain unaffected. Another may be a rose bush that sends up all blind shoots.

An infected Knockout rose in a retail parking lot

Sometimes the effected growth has more of an appearance like chlorosis, as seen in these pictures of a heavily infected bush in the parking lot of a shopping center near me. Last year, this same bush had that succulent-like appearance in growth on the same side of the bush as this new, very pale and somewhat "twisted" looking growth. If I had not seen the succulent-like growth that preceded this season's growth I might think it had herbicide damage. But sadly, this rose is not suffering from someone's careless use of Round-up. Instead it is going the way of my long-lost Pat Austin. Since taking these photos it has a new branch popping out of the infected side - a peculiar looking one with that strange succulent-like look.

Several images of the same bush follow

This is the down-side to the popularity of the Knockout Roses as landscape plantings in commercial areas like shopping centers. In an individual garden, the gardener is likely to notice the strange changes happening to an infected rose bush. Once noticed, the home gardener is usually going to try to find out what is wrong. But in parking lots and other commercial areas, the crews maintaining the plantings aren't likely to recognize what is unusual in a bush they may only look at two or three times in the entire growing season. The same crew may not even tend to the same shopping center more than once a year.

The only reason so many Knockout varieties seem to be affected is likely because of how popular they are, and not any special vulnerability to RRD. Its a shame - though there is an argument to be made that they have perhaps become over-planted, they are undeniably lovely. But I suspect we may be about to see quite a hit to them in my town.

another view

At the shopping center, the infected rose sits and sits. It gets pruned and the pruners may help infect other roses (but there is some question as to whether it can be passed along via pruning shears). But oddly it may be the gathering of the pruned branches that is more dangerous, as virus-carrying mites are set aloft with any wind gusts. With the proliferation of the Knock-out roses in commercial landscaping, and the likelihood that they will not be quickly identified and removed, they have the potential to be as big a disease vector for RRD as wild stands of multiflora rose are considered to be. Mites carrying the virus lift off of them in a breeze and float along to infect another rose upwind from it. There are infected stands in other shopping centers in town here too. And a suspect group in one of the city parks. I've pointed it out to some of the shop managers, but the infected bushes remain in place. Maybe the landscape companies are assuming herbicides are at fault here. Its not an unreasonable assumption. I would really like to believe that this were the case, but seems odd that suddenly last year so many bushes were being damaged like that when neither these bushes nor the herbicide use were new that year. And previous years saw no such outbreaks of herbicide damage. Certainly my own bushes did not have herbicide damage as no herbicides have been used on our property since we've been here (about a decade now).

another view

The Not-Pat-Austin rose that sat next to that first infected rose from about ten years ago has remained as healthy as it ever was (its prone to a bit of black spot when the weather is just right for it, but that is nothing new). No odd growth. The first year or two after removing the infected Pat I worried about it showing up in my other roses. But then I relaxed after no signs of further infection occurred and I started buying roses again with the fancy notion of trying to create my own. My collection grew to include some very shade and disease tolerant bushes and I was reading up on the topic of breeding roses. But then last year (2012) RRD returned to my garden. It showed up first in a nice red double Knock-out bush and a Wild Blue Yonder grandiflora. Both were quickly shovel-pruned even before snapping a photo. Both had that very characteristic extra-thorny,  "succulent-like" growth and a plethora of witches' brooms as well as distorted leaves and discoloration.

another view

Another - a Chrystler Imperial - exhibited signs only on one branch. I pruned out one side of the bush, including the roots on that side. The remains still haven't shown any sign of the disease. (As of June 23rd, this rose has now also been entirely removed after exhibiting new signs of infection. I got some very clear photos of the symptoms that have been added to this page). Now some may feel it is fool-hardy to not remove the entire bush, but there seems to be some anecdotal evidence to support this decision (I'll take that up again below).

We now know it is a virus at work here - not a phytoplasma like aster yellows as some believed it may be before the discovery of the RRD virus. There is even a test that has been developed to identify the presence of the virus.

Infected growth in another bush from the same parking lot

This newly discovered pathogen is a negative-sense RNA virus. It made its first recorded appearance in Manitoba, Canada in the early 1940s in multiflora roses,  though some sources site an earlier appearance in 1930s wild roses of mountainous regions of California and Wyoming. For a while it was considered to be specific to multiflora roses but this has been soundly proven wrong with RRD showing up in a wide variety of rose cultivars. There are even rumors that it was introduced on purpose to some wild stands of multiflora roses as a means to control this exotic invasive that has taken over whole pastures. Of course, in that very human way, we created our own problem with this fast growing rose - just as we may have even helped rotten RRD get a foothold if it really is true that it was introduced to some areas on purpose.

The twisted leaves, discoloration and increased thorniness of Rose Rosette Disease

The multiflora first came to the USA in the 1860s to be used as rootstock for grafted ornamental roses. In the 1930s the U.S. Soil Conservation Service began promoting it as a "living fence" for farmers that would fence in livestock and also aid in erosion control. Conservation departments from various states recommended its use for providing wildlife cover in the 1960s despite growing concern from some conservationists that it was damaging ecosystems in the wild. There are even some reports from the 1980s** that it was or had been used as a highway median divider to block out oncoming car headlights and as a crash barrier.

Infected rose in the foreground; healthy growth in the background

But the sad truth is that multiflora roses may not be any more prone to this virus than any other rose is. It is certainly not limited to multifloras. A microscopic mite, the rose leaf curl mite or Phyllocoptes fructiphilus, transmits the virus from bush to bush. This little tiny insect can not even fly. He is carried by the wind or hitches a ride from place to place on a larger more mobile creature.

Bits of distorted growth mixed in an area with normal growth

Once you have an infected rose, the virus may be able to be transmitted from bush to bush via your gardening pruners. However, some sources are now saying that transmission does *not* occur in this way (that's a positive in an otherwise dreary picture). Still, as we all know our usual rose villains can and do travel that way so a careful wipe down of the blades with a 10:1 water/bleach mix (10 parts water to 1 part bleach) after each cut as you are pruning roses is something to make a habit of in general. Some people use those prepared sanitizing wipes between cuts. Others use Lysol. If you spray with a Lysol-like product, I would still recommend physically wiping the blades of the pruner after each cut before spraying to make sure you don't have any infected particles sticking to your blades that could get transported to another rose. It may be a little over cautious but, hey, things like black spot are a concern anyway and there is no cure for RRD however a plant may acquire it. It may take a couple of years or even a little more for the plant to go through a decline and then death, but for a systemically infected plant, death is inevitable.

A few other tips:

  • Try to keep your rose bushes from having physical contact with one another when choosing where to plant them.When roses touch these flightless mites have a walking bridge to help them spread the infection.
  • Use dormant season horticultural oil on your roses to try to cut down on the number of mites in your garden.
  • Water from below, not above - this leaves less moisture on the plant for the mites - the mites need moisture.
  • In complete contradiction to the above, some gardeners have been spraying their bushes off with water on a schedule with the belief this dislodges these tiny mites. I don't know which is the more efficient strategy so take your pick.
  • Clean your pruners between cuts with a rag soaked in 10:1 bleach/water mix. For roses, this is just a good general rule to follow.
  • Keep a close eye on your roses and remove any suspect canes ASAP. If after cane removal, new growth exhibits symptoms its time to shovel-prune.
  • When pruning or removing roses, be aware of how much you may be helping  these mites get aloft on a breeze. Bagging as quickly as you can is a good idea. Using hairspray like I do may be overkill, but it certainly isn't going to hurt. I would recommend taking precautions to prevent any mites present from being sent adrift on a breeze especially if an infected rose is being removed from an area with other roses present.
Distorted growth seen in the center of the image

Now here's where things get a little controversial. Is RRD always systemic - ie if one branch shows signs of illness does that mean the entire bush is infected? According to some sources it does. Old school wisdom would say that in general, viruses and plant viruses are systemic. However, this is not always true (there are respiratory viruses that cause localized infection without viremia  and in plants, for example, cotton having non-systemic tobacco streak virus) and there is anecdotal evidence to suggest that quickly cutting any infected canes sometimes leaves a plant that shows no sign of infection. It may be that the virus is not quickly systemic - that it takes time for the virus to work its way throughout the plant.

a. Excessive thorniness along with distorted color and shape of RRD-infected growth on a Chrystler Imperial Hybrid Tea rose as compared to normal growth on the same bush (seen in image 'b')

The mite feeds on the new growth areas of the rose bush. This means usually at the top portions of a cane. So by aggressively pruning out affected canes as soon as a witches broom is sighted some plants seem to be "saved." The presumption is that the infection must travel down from the initial feeding site where the pathogen was introduced. If quickly removed the virus may not have time to travel beyond that initially infected cane. I've not heard of anyone having more than about a 50% success rate using this method, so a careful eye for symptoms reemerging should be maintained. Two Three of those I've removed canes from so far have gone on to show further infection and therefore warrant removal.

b. Normal new growth as see elsewhere on the infected Chrystler Imperial rose shown in image 'a' (compare thorniness in the two images)

Now I have a tendency to be one of those over-cautious types. So my method of removal when an infected plant is identified is to first spray down that infected area with a good, shellac-y type hairspray - you know, the cheap stuff. This will affix any of these mites to the branches so I do not send a fleet of them off on the wind to go infest other nearby roses. The assumption is that any mites present on the infected area are highly likely to now be carriers of the pathogen.Yes, I have sprayed entire 6 foot rose bushes (the  Knockout rose that got infected was a gorgeous monster of a bush before contracting the virus) down with hairspray before shovel-pruning them. Oh, how my neighbors must have laughed. Next time I need to remove such a big bush I might wrap the thing in plastic wrap before uprooting it. Probably after a good spray down with Aqua Net because that's how I roll - very, very cautiously.

Hairspray to affix mites to prevent their spread

If the rose bush exhibits witches brooms on multiple stems, then I spray and go for a full shovel-prune (ie uproot the sucker). If size allows, after the spraying I'll bag the whole bush before I begin digging it up. If too big, I'll take it down in parts and quickly bag up the pieces. If only one cane appears to be infected, I spray then remove that entire cane all the way to the ground. So far I have shovel pruned 7 bushes (Angel Face; Abraham Darby; Double Knock-Out; Wild Blue Yonder; one that was labeled Perfume Delight but was not; one marked as Queen Elizabeth but was not; and Pat Austin). I have two that I have removed canes from and am watching (Chrystler Imperial and Madame Pierre Oger).

Branches bagged before being cut off

Now whatever you do, do not compost an RRD infected bush and don't send it to the city pick-up for yard waste. Bag it up and put it in the garbage. If you are in an area where burning is feasible, that is another option but you would want to be careful that you are not transporting those itty bitty RRD-carrying mites about and setting them off on a breeze as you pull together your burn pile.


Bagged branches and roots of a removed rose

Although I have lost several bushes already, I've still got about 23 rose bushes which I am keeping an eye on, hairspray at the ready. I am holding off on buying any new roses (which takes an awful lot of self control) and am certainly not continuing in my attempts at breeding them. Not until I see just how living with RRD is going to play out in the next couple of years.

 Rose Rosette Disease does not persist in the soil but infected mites may still be present so its best to wait a couple of years before planting roses in the area again. If any roots reemerge they should be promptly dug up, bagged and disposed of.

***************************************************
For more reading on Rose Rosette Disease:

Paul Zimmerman Roses
Ann Peck's excellent e-book on RRD
Hydrogen Peroxide for RRD?
A very informative page with more interesting links re RRD


***************************************************


**Evans, J.E. 1983. A literature review of management practices for multiflora rose (Rosa multiflora). Natural Areas Journal 3:6-15. (I couldn't find a good link online for this source but felt it should be identified)